

Cheesy rice balls are a delicious snack with a crispy golden exterior and a gooey, cheesy center. Filled with mozzarella and fried to perfection, they’re perfect as a snack, appetizer, or side dish. Serve them with marinara or your favorite dipping sauce for a family favorite everyone will love!
The Inspiration Behind The Cheesy Rice Balls Recipe
Cheesy rice balls are inspired by two classic dishes—arancini, traditional Italian rice balls, and onigiri, a rice ball commonly eaten in Japan. Both dishes involve rolling rice into balls and sometimes stuffing them with fillings like meat or cheese. In this recipe, we add mozzarella cheese to the rice and fry it to a crispy finish, creating a delicious and satisfying treat. It’s a fun and flavorful way to enjoy cheesy rice in a bite-sized form!
Ingredients
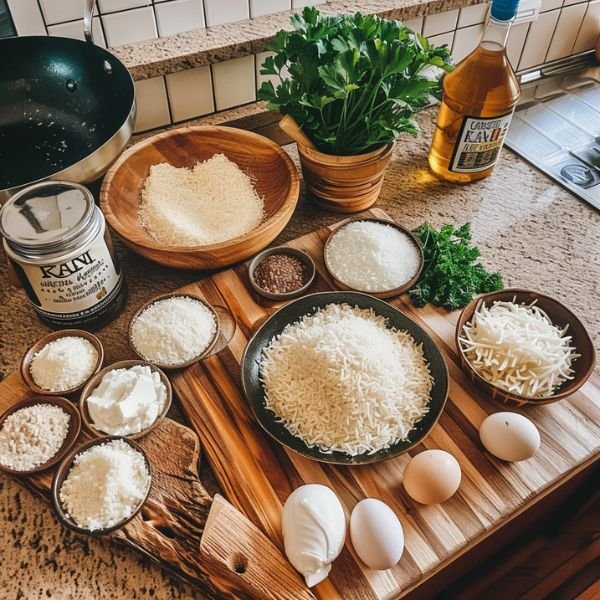
To make cheesy rice balls, you’ll need the following ingredients:
- 2 cups cooked white rice (preferably cooled)
- 1 ½ cups shredded mozzarella cheese
- ¼ cup grated Parmesan cheese
- 1 egg (beaten)
- 1 teaspoon garlic powder
- 1 teaspoon onion powder
- Salt and pepper to taste
- ½ cup all-purpose flour
- 1 cup breadcrumbs (panko breadcrumbs work best for extra crispiness)
- Vegetable oil for frying (or olive oil for a lighter option)
- Fresh parsley (optional, for garnish)
Instructions
- Prepare the rice mixture: In a large bowl, mix the cooked and cooled rice with mozzarella cheese, Parmesan cheese, egg, garlic powder, onion powder, salt, and pepper. Stir everything until the rice is coated evenly with the seasonings and cheese.
- Form the rice balls: Use your hands to take a tablespoon of the rice mixture and roll it into a ball. Press gently to ensure the mixture sticks together. Continue making rice balls until all the mixture is used up.
- Coat the rice balls: Place flour in a shallow bowl, the beaten egg in another bowl, and breadcrumbs in a third. Roll each rice ball first in the flour, then dip it in the egg and coat it in the breadcrumbs.
- Fry the rice balls: Heat vegetable oil in a large frying pan or use a deep fryer over medium heat or hot oil (about 350°F or 175°C). Once the oil is hot, carefully place the rice balls into the oil, ensuring not to overcrowd them. Fry them for 3–4 minutes until they are golden brown on the outside. Use a slotted spoon to remove the rice balls and drain any excess oil on paper towels. You can use paper towel-lined plates to help absorb any leftover oil for an extra crispy texture.
- Serve: Garnish with fresh parsley, if desired, and serve with marinara sauce or your favorite dipping sauce for extra flavor.
Variation
Cheesy rice balls are super customizable! Here are a few ways to change them up:
- Spicy Cheesy Rice Balls: Add finely chopped jalapeños or a pinch of red pepper flakes to the rice mixture for a spicy kick.
- Meat-filled Rice Balls: You can stuff the rice balls with cooked ground beef, sausage, or even bacon for a meaty version.
- Veggie Rice Balls: Add sautéed vegetables like spinach, mushrooms, or bell peppers to the rice for a veggie-packed option.
- Extra Cheesy Rice Balls: Mix in some cream or ricotta cheese for an even creamier filling.
Cooking Notes
- Rice Consistency: Ensure the rice is cooled before using it in the rice balls. Warm rice can become too sticky, making it hard to form the balls.
- Oil Temperature: Ensure the oil is hot enough to fry the rice balls. If the oil is too cold, the rice balls absorb more oil and become greasy.
- Cheese Options: Mozzarella is the best choice for that melty, gooey center, but you can experiment with other cheeses like cheddar or gouda for different flavors.
Serving Suggestions
Cheesy rice balls are versatile and can be served in different ways:
- Dipping Sauces: Pair them with marinara sauce, ranch, garlic aioli, or even a spicy Sriracha mayo for a flavorful dip.
- As a Side Dish: Serve the cheesy rice balls as a side with your favorite main dish, such as pasta, chicken, or a salad.
- As Party Appetizers: These little crispy rice balls are perfect for entertaining! Please set up a dipping station with various sauces so your guests can choose their favorites.
Tips
- If the rice mixture is too wet to form into balls, add more breadcrumbs or flour to help it stick together better.
- To make them ahead of time, you can prepare and coat the rice balls and refrigerate them for up to 2 hours before frying.
- For a healthier option, bake the rice balls instead of frying them. Simply place them on a baking sheet lined with parchment paper and bake at 375°F (190°C) for about 20 minutes, flipping halfway through.
Prep time
15 minutes
Cooking time
15 minutes
Total time
30 minutes
Nutritional Information (per serving)
- Calories: 250
- Fat: 14g
- Carbohydrates: 25g
- Protein: 8g
- Fiber: 1g
- Sodium: 360mg
Why Cheesy Rice Balls are the Perfect Party Snack
Cheesy rice balls are the perfect snack for any party! They’re easy to make, fun to eat, and delicious with their crispy outside and gooey cheese inside. You can make a big batch of them; they’re great for sharing with friends and family. Serve them with marinara sauce or ranch dressing for dipping; everyone will love them! Plus, they’re easy to customize with different flavors and fillings, making them the perfect snack for any occasion.
How to Make Cheesy Rice Balls Without the Mess
Making cheesy rice balls doesn’t have to be messy. A straightforward way to keep it clean is by setting up three separate bowls: one with flour, one with a beaten egg, and one with breadcrumbs. This makes it easy to coat each rice ball without making a mess. After you’ve shaped the rice balls, you can carefully dip each one into the flour, egg, and breadcrumbs. Also, when it’s time to fry them, use a slotted spoon to take the rice balls out of the hot oil. This keeps the oil from splashing and helps them drain quickly onto paper towels.
The Best Cheese Options for Cheesy Rice Balls
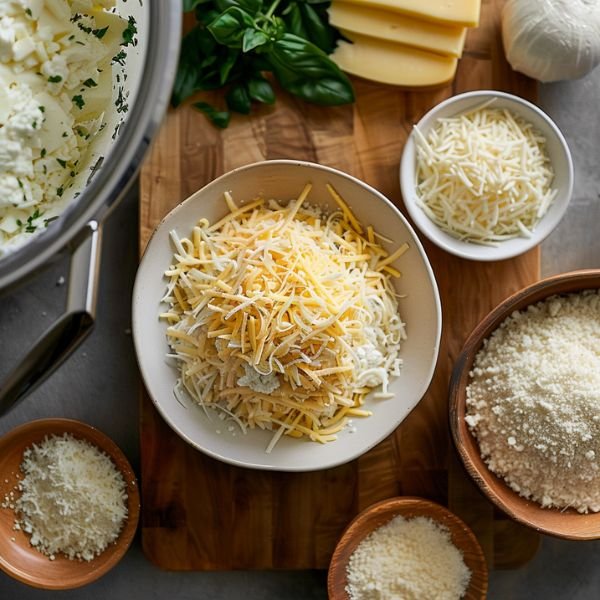
Mozzarella cheese is the most common cheese used for cheesy rice balls because it melts so well and creates that gooey center we all love. However, you can mix it up with other cheeses, too. Cheddar cheese adds a sharp, tangy flavor, while provolone brings a mild, smooth taste. If you want something extra creamy, add some ricotta or cream cheese. Don’t forget to sprinkle a little Parmesan cheese on top or in the rice mixture for added flavor!
How to Store and Reheat Cheesy Rice Balls for Later
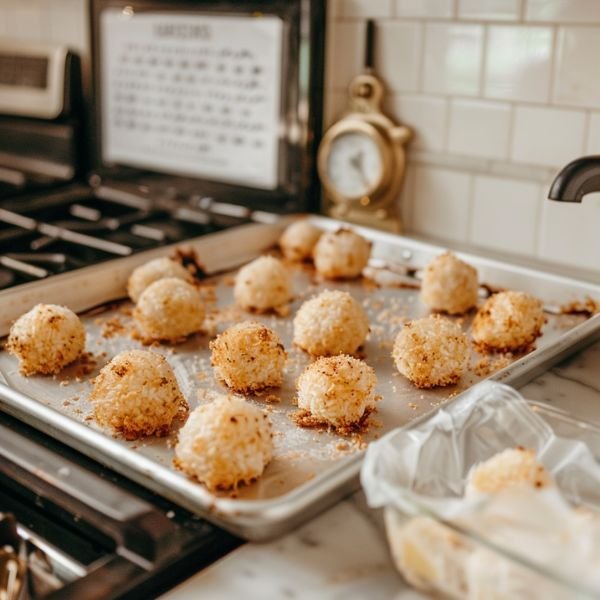
If you make a lot of cheesy rice balls and want to save some for later, you can freeze them! After forming and breading the rice balls, lay them on a baking sheet and freeze them for about 30 minutes. Then, transfer them to a bag or container and keep them in the freezer for up to a month. When ready to eat them, bake them on a baking sheet at 375°F (190°C) for 15-20 minutes or until they’re hot and crispy again. You can enjoy them later without losing that perfect crispy texture!
Cheesy Rice Balls: The Ultimate Comfort Food for Any Season
Cheesy rice balls are not just for winter—these tasty treats are perfect for any season! During the colder months, they’re a cozy snack to enjoy by the fireplace, or you can pair them with soup for a warm and satisfying meal. But in the summer, they’re great for barbecues or picnics. You can even serve them cold, and they’re still tasty. No matter the time of year, cheesy rice balls are a comforting and delicious snack everyone will enjoy.
Gluten-Free Cheesy Rice Balls: A Delicious Twist
If you need a gluten-free option, don’t worry! You can still make cheesy rice balls. Instead of regular breadcrumbs, use gluten-free breadcrumbs or ground almonds. You can also use rice flour to help bind the rice mixture. These small changes will give you the same crispy, cheesy rice balls without the gluten so everyone can enjoy them!
How to Customize Your Cheesy Rice Balls with Fun Fillings
One of the best things about cheesy rice balls is how easy it is to change up the flavors! You can add different fillings to make them your own. For example, you could stuff them with cooked chicken, ground beef, or even bacon for a meaty treat. You can add spinach, mushrooms, or bell peppers if you prefer a vegetarian option. Try adding cream cheese or goat cheese in the middle for a cheesy version. Don’t be afraid to get creative—there are endless ways to customize these tasty snacks!
The History of Rice Balls and How They Evolved into Cheesy Delights
Rice balls have been enjoyed in many cultures for centuries. In Japan, rice balls are called onigiri and are often filled with ingredients like fish or pickles. In Italy, a dish called arancini is rice balls stuffed with ragu or cheese. Over time, people started experimenting with adding cheese to rice balls, and the cheesy rice ball was born. Today, cheesy rice balls are loved worldwide, offering a fun twist on traditional rice ball recipes and becoming a favorite snack for many.
How to Make the Perfect Cheesy Rice Balls in Just 30 Minutes
Making cheesy rice balls is quick and easy, taking about 30 minutes from start to finish. Mix cooled cooked rice with shredded mozzarella cheese, Parmesan cheese, and garlic and onion powder seasonings. Then, form the mixture into small balls, coat them with flour, egg, and breadcrumbs, and fry them until golden brown and crispy. It’s that simple! In just half an hour, you’ll have a batch of delicious, cheesy rice balls to enjoy.
The Secret to Crispy, Gooey, Cheesy Rice Balls Everyone Will Love
The secret to perfect cheesy rice balls is balancing between a crispy exterior and a gooey, cheesy inside. To achieve this, ensure your rice is cooled before mixing in the cheese, which helps the rice balls hold together. Fry them in hot oil at medium heat for the perfect crispy texture, and use mozzarella cheese for that melty, gooey center. The crunchy breadcrumbs give the outside a golden finish, making these rice balls irresistible!
Why Cheesy Rice Balls Are the Ultimate Snack for Any Occasion
Cheesy rice balls are the ultimate snack because they’re easy to make, customizable, and loved by everyone. Whether hosting a party, having a family dinner, or craving something cheesy, these rice balls are perfect. You can even make them ahead of time and store them in the fridge or freezer! With their crispy coating, gooey cheese center, and endless dipping options, cheesy rice balls are a hit at any gathering.
Step-by-Step Guide to Making Homemade Cheesy Rice Balls
If you’ve never made cheesy rice balls, this simple, step-by-step guide will walk you through the entire process. This guide makes it easy to follow, from gathering your ingredients (like mozzarella cheese and Parmesan cheese) to rolling and breading the rice balls. Then, fry them to golden brown perfection in vegetable or olive oil, and enjoy them with a marinara sauce. This guide helps you create the perfect cheesy rice balls every time!
Cheesy Rice Balls: A Fun and Tasty Twist on Traditional Rice
Cheesy rice balls put a fun twist on regular rice dishes. Instead of serving plain rice, you can stuff it with gooey mozzarella cheese and seasonings, roll it into balls, and fry it until crispy. This simple recipe adds a new flavor and texture to your rice dishes. For an added kick, serve with your favorite dipping sauce, like marinara sauce. These cheesy rice balls are a creative way to enjoy rice in a whole new way!
10 Delicious Ways to Customize Your Cheesy Rice Balls
Cheesy rice balls are versatile, and you can customize them in many ways! Here are 10 fun ideas:
- Add cooked bacon or sausage for a meaty version.
- Mix in spinach or other vegetables for a veggie-filled option.
- Add jalapeños or hot sauce for a spicy kick.
- Use cheddar cheese instead of mozzarella for a sharp flavor.
- Add some garlic powder or onion powder for extra seasoning.
- Make them with brown rice instead of white rice for a healthier option.
- Try adding cream cheese for an even creamier filling.
- Mix a little Parmesan cheese to the rice mixture for a cheesy bite.
- Stuff the rice balls with extra cheese or meatballs for a surprise inside.
- Serve them with various dips like ranch dressing, guacamole, or barbecue sauce.
FAQs
Can I use brown rice instead of white rice?
Yes, brown rice can be used instead of white rice. Just make sure the rice is fully cooked and cooled before making the rice balls.
Can I make these cheesy rice balls in advance?
You can prepare and coat the rice balls beforehand, then refrigerate them for 2 hours. You can also freeze them and fry them later.
Can I bake cheesy rice balls instead of frying them?
Yes! Preheat the oven to 375°F (190°C) and bake the rice balls for about 20 minutes, flipping them halfway through to ensure they become crispy on all sides.
Conclusion
Cheesy rice balls are a delicious, fun, and easy snack that everyone will enjoy. With their crispy coating and cheesy, gooey inside, they make a perfect appetizer or side dish for any meal.
You can easily customize the flavors and fillings to suit your tastes, and they’re a great way to use up leftover rice. Whether you choose to fry or bake them, cheesy rice balls are always a crowd-pleaser!


